Cycling Training with Power and WKO
by Tim Cusick
Overview
The past five to ten years have seen cyclists and triathletes investing in power meters and upping their training game as never before. And for good reason: training with a power meter is the most precise way to diagnose, prescribe, and track your training to ensure the best utilization of your training time.
Why is power best? The answer is simple; power is the leading measurement of the stress applied to the body. For example, let's compare training with a power meter to training with heart rate. Power is the leading indicator, which means that as soon as you pedal harder, you will see your watts increase. In contrast, heart rate is a trailing indicator; you have to pedal harder for a while before your heart rate increases.
So is power a better training method than heart rate? I would say yes. Look at this simple comparison:
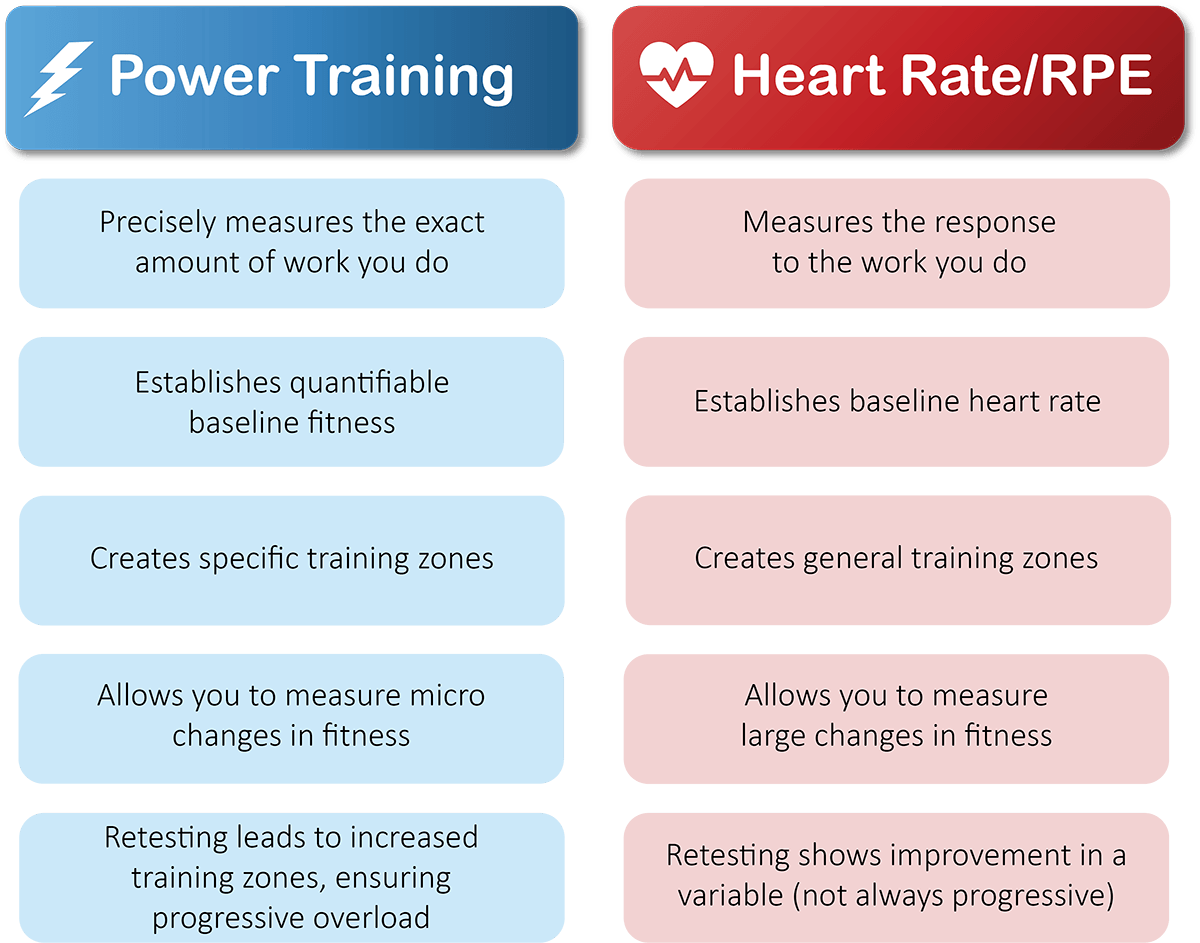
Power data better quantifies both the stress on your system and your system’s response to that stress.
Getting started with Power Training
When you invest in power training, the best thing you can do is set up a TrainingPeaks account
and begin collecting all your data there. It’s tempting to jump right in and immediately look for results, but if you want to learn how to train with power, the first step is to learn to calibrate your feelings with your data.
Before Step 1: Ride with Power for 28 days
This is one of the easiest and hardest steps. For the first four weeks of your life with a power meter, I recommend that you simply ride as normal and collect power data in two formats.
First, make sure you have power on your head unit screen and watch it as you ride. How high does it go as you surge up a hill? What about during a hard pull with your group? Over a longer climb? How much do your watts drop when you come over the top of a hill? You will quickly notice a large variation in the power numbers, but it’s stochastic (not predictable), and you will soon learn to see the patterns. One helpful tip is to set your head unit to smooth the power data over 3 seconds; this will help you see the patterns more clearly.
Second, review each ride in TrainingPeaks and look for observations or patterns in your data. An observation can be as simple as “that was a really hard day” and that your average watts were higher than normal. Just review the data and see how it correlates with how you felt and what you thought your effort was.
The Steps of Power Training with WKO
Now that you’re used to seeing your data and are developing a feel of the outputs, let’s start training with power with WKO. The first thing you’ll need to do is to link WKO to your TrainingPeaks account
and sync your data. Once your data is in WKO, you’re ready to get started.
Step 1: Formal Testing
The first step of power training is to complete a formal round of testing with timed maximal efforts. I suggest completing the following tests to kicks things off:
- 5-second max effort
- 1-minute max effort
- 5-min max effort
- 30-minute max effort
These tests should be completed one at a time (one per day) and over the course of a week. The goal is to hit the best possible number for each test, so limiting the tests to one per day will help keep you fresh. This process is known as the structured test protocol, and it only needs to be tested one or two times a year to establish and maintain your individual Power-Duration Model. Once your test week is completed, move on to the next step.
Step 2: Diagnose the Athlete
Let’s learn a little about you and your ability. A great place to start is WKO’s Insights tab. Being with your phenotype. What type of rider are you? A sprinter? A time trialer?
Next, look at both your power profile and your power-duration model profile; how do you compare?
Now review the PD Curve Profile Strengths and Limiters chart. What areas of your profile are higher and in the green? These are your individual strengths. What areas of your profile are lower and in the yellow or red? These are your limiters. This chart will give you immediate insight into the areas you need to maximize and the areas you need to work on. The old adage is very relevant here: “Race your strengths but train your weaknesses.”
Step 3: Establish your Individualized Training Levels
Also on the Insights tab are your Individualized Training Levels (iLevels). These training zones are based not only on your FTP but also on your entire Power-Duration Model. This results in more accurate training intensity targets and will guide your interval workouts to maximal results.
Step 4: Buy or Build a Training Plan
This is one step that happens outside of WKO. You need to either purchase a training plan or create your own. TrainingPeaks offers pre-built plans, or you can use their annual training plan (ATP) builder
to make your own. Once you’ve selected or built a plan, load it to your TrainingPeaks account, and it will automatically download to WKO.
Step 5: Train and Track Your Progress
Once you start your training plan, track your progress in WKO. I recommend that you start your tracking using the Basic Cycling view or Basic Multi view, depending on your specific event(s). These views will supply you with key insights and actionable intelligence for training load, performance improvement, and more.
WKO provides Optimized Intervals
as a further benefit of the WKO Power-Duration Model. Optimized Intervals are highly specific time and intensity targets built for you specifically to bring you the best results. Your current Optimized Intervals can be found on the Insights tab in WKO, and they update automatically as you feed your Power-Duration Model with new workouts and performances.
Step 6: Ongoing Testing
In order to maintain the accuracy of your Power-Duration Model metrics and your Individual Training Levels, you will need to perform occasional maximal efforts. This is not formal testing, and it can be blended into your training. What tests should you complete? Since you have completed your formal testing already and your Power-Duration Model has already been established, we can now use the model to get the answer to this question. In WKO, click on the Insights tab and scroll down to the chart named “Best Times for Informal Testing.” This chart will give you a testing time target for a short, a medium, and a long effort. Each should be tested every 4-6 weeks (not necessarily in the same week) to maintain the model’s accuracy.
This six-step process should give you the basics and get you training with power successfully. As new data comes in and your performance improves, the WKO Power-Duration Model will update automatically and keep your training targets accurate and maximized.
About TrainingPeaks WKO
WKO is a power data analytics engine built to unlock the secrets of your endurance training and performance data. Click here
for more information and to download your free trial of WKO today.
About the Author
Tim Cusick is the TrainingPeaks WKO Product Development Leader, specializing in data analytics and performance metrics for endurance athletes. In addition to his role with TrainingPeaks, Tim is a USAC coach with over 10 years of experience working with both road and mountain bike professionals around the world. He is also the co-owner of Velocious Cycling Adventures.